Featured Post Today
print this page
Latest Post
Showing posts with label Computer Tricks. Show all posts

How do I remove computer memory in my computer?


f memory is already installed in your computer memory slots, some or all of it will need to be removed before additional memory can be added. Below are the steps on how to remove memory from your computer.

If the computer is not already opened, open the computer and locate the memory in the memory slots you want to remove.


If all your memory slots are occupied and you're not sure what memory to remove, use a third-party tool such as the online Crucial Memory scanner to display your memory information. In the picture to the right, is an example of what the results of this memory scanner may show. As can be seen in the picture, the example computer has 8GB of memory with 2GB memory cards in each of the available slots. If you wanted to upgrade this to a total of 16GB of memory, you would remove all 2GB memory sticks and replace them with 4GB memory modules.

Once you've located the memory you want to remove from the computer you should notice two tabs on either side of the memory slot as shown in the below picture. Press each tab down and away from the memory slot. If done successfully, the memory should pop out and once both tabs are away from the memory module you can lift the memory out with no effort.
0 comments

How To Enable Game In Window 7 ?

1. CLICK ON START BUTTON.


2. GO TO CONTROL PANEL.


3. CHANGE THE CATEGORY IN VIEW MODE.

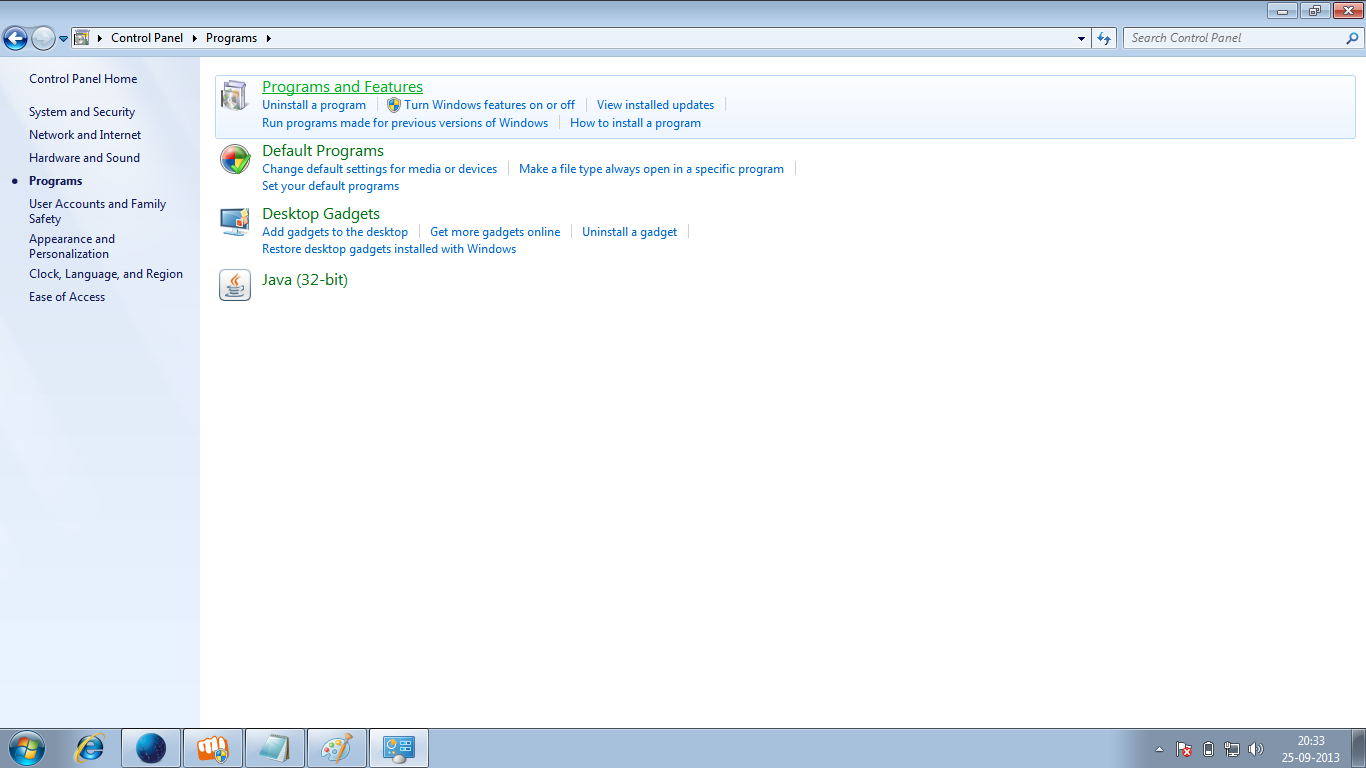
4. SELECT PROGRAM.

5. SELECT PROGRAM AND FEATURES.

6. THEN CLICK ON (LEFT SIDE) TURN WINDOWS FEATURES ON OR OFF.


7. DOUBLE CLICK ON GAMES AND OK.

8. NOW YOUR GAMES ARE READY.
0 comments

Create A Hidden User Account


This tweak allows an account that is normally displayed on the Welcome screen to be hidden from view. To log on using the account it's necessary to use the Log On To Windows dialog box similar to the one in Windows 2000. #[Start] [Run] [Regedit]#Registry Key:

HKEY_LOCAL_MACHINE\SOFTWARE\Microsoft\WindowsNT\CurrentVersion\Winlogon\SpecialAccounts\UserList#Modify/Create the Value Data Type(s) and Value Name(s) as detailed below.#Data Type: REG_DWORD [Dword Value] // Value Name: Type Name of Account to be Hidden#Setting for Value Data: [0 = Account is Hidden / 1 = Enabled]#Exit Registry and Reboot...

While the account is hidden on the Welcome screen, note that the account profile will be visible in C:\Documents and Settings or wherever user profiles are stored as well as in Local Users and Groups
0 comments

Hidden Programs In Windows XP !


Is it strange to hear , but true that some good programs are hidden in Windows XP !!!

Programs :

1. Private Character Editor :

Used for editing fonts,etc.
** start>>Run
** Now, type eudcedit

2. Dr. Watson :

This an inbuilt windows repairing software !
** start>>Run
** Now, type drwtsn32

3. Media Player 5.1 :

Even if you upgrade your Media Player, you can still access your old player in case the new one fails !!!
** start>>Run
** Now, type mplay32

4. iExpress :

Used to create SetupsYou can create your own installers !
** start>>Run
** Now, type iexpress
0 comments

Does When U Double Click On Drive... New Window Opens?


Whenever ppl double-click on any folder in Computer,
it opens in a new window even if selected the option “Always open folders in same window” in “Tools -> Folder Options”.
For this kind of Problem
Download following zip file, extract it and then run .REG file and confirm the action:

Download
0 comments

How To Enable Game In Window 7 ?

1. CLICK ON START BUTTON.


2. GO TO CONTROL PANEL.


3. CHANGE THE CATEGORY IN VIEW MODE.


4. SELECT PROGRAM.


5. SELECT PROGRAM AND FEATURES.


6. THEN CLICK ON (LEFT SIDE) TURN WINDOWS FEATURES ON OR OFF.


7. DOUBLE CLICK ON GAMES AND OK.


8. NOW YOUR GAMES ARE READY.
0 comments

How to Setup Windows 7 from USB drive?


Step1: Create Bootable USB Drive:
Start PowerISO (v4.8 or newer version, download here).
Insert the USB drive you intend to boot from.
Choose the menu “Tools > Create Bootable USB Drive”. The “Create Bootable USB Drive” dialog will popup. If you are using Windows Vista or Windows 7 operating system, you need confirm the UAC dialog to continue.
In “Create Bootable USB Drive” dialog, click “…” button to open the iso file of Windows 7.

Select the correct USB drive from the “Destination USB Drive” list if multiple USB drives are connected to the computer.
Choose the proper writing method. “USB-HDD” is recommended.
Click “Start” button to start creating windows 7 bootable USB drive.
If no errors occured in the above process, you should now be all set to setup Windows 7 from USB drive!
Step 2: Configuring the BIOS:
You should now reboot and go into the BIOS configuration to boot from USB. Instructions for doing so wildly from system to system, but generally entail the following:
Reboot the system.
While booting (before Windows starts loading), get into the BIOS configuration screen by hitting something like F1, F2, Delete or Escape. Hotkey instructions are generally provided on the screen.
Go to the section that contains your boot devices.
With your USB drive plugged in, the USB drive should be listed. If it isn’t, your system might not support booting from USB. Assuming that it is supported (as is the case with virtually all modern hardware), promote your USB drive to the primary boot device.
Exit from the BIOS configuration, saving all changes.
If you’re completely new to BIOS configuration, BIOS for Beginners over at Tom’s Hardware might be a good primer. Be aware though, that you can seriously screw up your system by providing incorrect settings!

Step 3: Booting and setup windows 7 from USB drive:
Assuming that you properly configured your BIOS and your USB drive supports booting,  Windows 7 setup should now load. Depending on the speed of your USB drive, this may take a while.
If it isn’t working, then double-check the following before making a scene:
Is your BIOS properly configured for booting from the USB device? (Is the USB device listed and does it have top priority?)
Have you correctly prepared the USB drive in step one? (Restart the procedure.)
Does your USB drive properly support being booted from? (Try another one!)
0 comments

Any Folder as Photo Folder


This tricks shows you how to setup any folder to display its contents as a photo folder. In many cases, you save your images/photos in a folder different than “My Pictures” (under “My Documents“). Since this folder you choose is just like any other normal folders, its contents displayed as a listing of files. You can temporary change it by just right-click and select “View” >> “Thumbnails“. But if you want to change the folder so that everytime you come back, the folder itself, as well as all its subfolders, display the contents as photo thumbnails.
Here’s How
  • Right-click on the folder you choose and select “Properties
  • Select “Customize” Tab. Then under “Use this folder type as a template“, select “Pictures (best for many files)
  • Check on “Also apply this template to all subfolders” to apply the setting to subfoders as well
  • Click OK to exit
0 comments

How to add an image to the background of any folder

In this tutorial , we will see how to add an image to the background of any folder.It looks like this:

1) Create New Folder; right click on Desktop, then New folder… or just open a folder in which you wish to add the background image
2) Copy this code in notepad
[ExtShellFolderViews] {BE098140-A513-11D0-A3A4-00C04FD706EC}={BE098140-A513-11D0-A3A4-00C04FD706EC} [{BE098140-A513-11D0-A3A4-00C04FD706EC}] IconArea_Image=C:\path\folder\background.jpg It looks like this:3)Save the notepad file in folder for which you wish to add background image, as shown below
 4)After this select folder, right click on that folder, click properties and select Customize tab, then click on change icon, here choose any icon.After this the background image will appear…
0 comments

How to save Passwords using Keepass


KeePass Password Safe:
KeePass Password Safe is a free, open source, light-weight and easy-to-use password manager forWindows. You can store your passwords in a highly-encrypted database, which is locked with onemaster password or key file.

Here i have Provied Step by Step instructions  to save Passwords using Keepass:

*First of all download Keepass from here*Install Keepass.
1. Now open the Keepass application.A dialogue box will appear asking u for a Master Password.Before giving the Master Password make sure you Click Hide Password Button as shown in the figure below.(Note:This is the method which is used to see all passwords in Keepass).
2. Click Ok.
3. A Repeat Master Password dialogue box will appear.Give the Same Password .Click Ok
4. Now we are ready to save all passwords.Here i am going to say how to save Passwords of ur email ids.The Same Procedure is applicable to save passwords for Windows,network,internet,homebanking.
5. 
Click on the email as shown in the screenshot below.

6. Now click on the Add Entry where the Cursor is Placed as shown below.
7. You will get a dialogue box like this.Fill the necessary details.
8.Click ok.
9. To add the password of another email account Click Add entry(Step 6).To Edit/View the Stored Password Click on the Edit/View icon next to Add Entry.
10. Now after adding all the Passwords. Click File–>Save as give a file name it will be saved as .kdbextention 
You may have a doubt where it is safe to save important passwords using Keepass?The answer is Yes.The Stored passwords will be in Encrypted Form.The Other users in cannot view the  Passwords without giving the Correct the Master password.
See the below sceenshot if i try to open in notepad the saved .kdb file is in encrypted form.
0 comments

How to Hack Windows 8 Password if Forgot or Lost?


Most of our Win 8 users have no idea to hack Windows 8 password when forgot or lost it. Well, it is very common for us to forgot Windows 8 password, but it is no hard to hack it at least. Thus, you have no necessary to worry about it.
First, you should try Windows-provided way, the only stuff you have to prepare is win 8 password reset disk. However, most of win 8 users have not created this disk in advance either because they never thought they would lost Windows 8 password one day or unaware of this feature existed. Luckily all of you, all kinds of Windows 8 password hacker tool are available today. You can free download them from any accessible computer and then burn a win 8 password reset disk on your CD/DVD/USB. At last use this disk to hack password Windows 8 on your locked computer. Here I would like to share 3 popular Windows 8 password hacker with all of you.

Top 1: Ophcrack
Have you ever heard about Ophcrack? It is the most popular Windows 8 password reset tool for its free and open source superiority. What you need to do is go to the official website to download and burn the OPHCRACK Live CD and boot the PC using the Live CD. However, it is hard to operate especially for computer newbie, as it requires some computer skills. Moreover, you may fail to hack your forgotten win 8 password sometimes. In other words, it is no suitable for computer newbie.
Top 2: Windows Password Key
As an easy-to-use-tool, Windows Password Key is designed for hacking Windows domain or local passwords on Windows 8/7/Vista/XP/2012/2011/2008/2003. Well, you can hack your lost Windows 8 password within 4 minutes, no matter the length or complex of your password. Besides Windows password hacker function, you can create a new account as well.
Superiority:
Easy (Download – Burn – Reset);
Fast (Takes Only 4 minutes even less);
Safe (Without any data loss).
Top 3: Windows Password Recovery Tool
Windows Password Recovery tool is a professional Windows 8 password recovery software which can help you hack password Windows 8 easily and quickly. With it, you can create a password reset CD/DVD or USB Flash Drive that works at the time of booting process and hack forgotten Windows 8 password within 3 steps. It also supports any Windows system and any brands PC.
Windows 8 Password Hacker Tools Aren’t Necessary if You’re Proactive!

Ok, if you have win 8 password reset disk, you have no need to use those Windows 8 password hacker tools. This is a special disk which you only need to insert in your win 8 computer during the logon process and then you can hack your forgotten win 8 password with it. Well, it is a good habit for you to create a win 8 password reset disk when set a win 8 password. You may forget your password one day, who knows. Still have difficult in creating one: Visit: How to Create a Windows 8 Password Reset Disk?
0 comments

How To Make Your Computer Faster - Increase Virtual RAM


Here I am posting a trick to increase virtual RAM and make your computer system faster. Just follow below simple steps
 1)  Right Click on My Computer and Select Properties .
2)  Now Click on the Advanced Tab.
3)  Now Under Performance Tab click on Settings .
4)  Click on Advanced Tab on the Button that Pops up .
5)  Now Under Virtual Memory Click on Change >- Custom Size.
6)  For the initial size (depending on your Hard Disk space) type in anywhere from 1000-1500 ,and for the Maximum size type in anywhere from 2000-2500.
 7) Now Click on Set and then exit out of all the windows.
8) Restart your Computer and now you have faster computer and 1-2 GB Virtual RAM
0 comments

How to Use USB Pen drive as RAM of Computer

Here I am sharing you a trick to increase your RAM without any extra investment. This trick will surely improve the performance of your computer and increase operational speed. Here you have to use a USB pen drive or flash drive, which can be used as RAM of your computer. Before trying this trick, make sure this can damage pen drive so be careful. To make it true we have to make some modifications. Just follow given steps carefully.

How to use USB pen drive as RAM in Windows XP -: 

1. First connect your pen drive to computer. Note that pen drive should be at least of 1GB.
 2. Now right click on the my computer and then click properties.
3. Click on Advanced Tab and then Performance.
4. Now click on Advanced and then click on Virtual Memory.
 5. Select your pen drive icon and click Custom size.
6. Now view the memory available in your pen drive and note it down then click on OK.
7. Restart your computer and enjoy your fast system.

How to use USB pen drive as RAM in Windows Vista and Windows 7 -: 

1. Insert your pen drive and format it.
2. Right click on your pen drive and click on properties.
3. Now click on Ready boost tab and then Use this device.
 4. Choose maximum space to reserve system speed then click on OK and Apply. You've done! use your pen drive as RAM. 
0 comments

Windows 8 – Assign Static IP Address

So what is a fairly simple task in Windows 7 turns out to take a bit of time in Windows 8. What task might that be? Hmm, maybe changing the IP to a static IP address! Granted, 80% of the extra time it takes to do it in Windows 8 is because of the new Metro UI, which makes it difficult to even get to the Control Panel easily.

In this article, I’ll walk you through the steps necessary to configure a static IP address in Windows 8. Along the way, I’ll mention a few things about Windows 8 and how you can make it a little less frustrating. For example, it’s nice to just add the Control Panel to your desktop rather than going through the whole Metro UI.

To get started, let’s go to the Start Screen. You can do that by moving your mouse to the lower left part of the screen (where the start button used to be), opening the charms bar by moving your mouse to the upper right corner of the screen and clicking on Start, or by simply clicking on the Windows key on your keyboard.

Once on the Start Screen, right-click on a blank space and you’ll see the All Apps icon appear at the bottom.

Computer tips and tricks as well as software, hardware, internet that help make you more productive and your overall computer experience a lot more enjoyable. Computer tips and tricks, tricks,computer tips, computer, tips, information, listing, tip, computer tip, about, windows, internet, internet, ticks, explorer, Microsoft


Now you will see Control Panel if you scroll to the right side.

Computer tips and tricks as well as software, hardware, internet that help make you more productive and your overall computer experience a lot more enjoyable. Computer tips and tricks, tricks,computer tips, computer, tips, information, listing, tip, computer tip, about, windows, internet, internet, ticks, explorer, Microsoft


Go ahead and right-click on Control Panel and you’ll see it gets checked and a few options appear at the bottom of the screen. Go ahead and click Pin to Start and Pin to Taskbar. You may have to right-click on it again to do both.

Computer tips and tricks as well as software, hardware, internet that help make you more productive and your overall computer experience a lot more enjoyable. Computer tips and tricks, tricks,computer tips, computer, tips, information, listing, tip, computer tip, about, windows, internet, internet, ticks, explorer, Microsoft


Now you can open the Control Panel from the Windows 8 desktop or from the Start screen. Open the Control Panel and click on Network and Sharing Center.

Computer tips and tricks as well as software, hardware, internet that help make you more productive and your overall computer experience a lot more enjoyable. Computer tips and tricks, tricks,computer tips, computer, tips, information, listing, tip, computer tip, about, windows, internet, internet, ticks, explorer, Microsoft


Now click on Change Adapter Settings in the left-hand pane.

Computer tips and tricks as well as software, hardware, internet that help make you more productive and your overall computer experience a lot more enjoyable. Computer tips and tricks, tricks,computer tips, computer, tips, information, listing, tip, computer tip, about, windows, internet, internet, ticks, explorer, Microsoft


Right-click on the network adapter you want to make static and click on Properties.

Computer tips and tricks as well as software, hardware, internet that help make you more productive and your overall computer experience a lot more enjoyable. Computer tips and tricks, tricks,computer tips, computer, tips, information, listing, tip, computer tip, about, windows, internet, internet, ticks, explorer, Microsoft


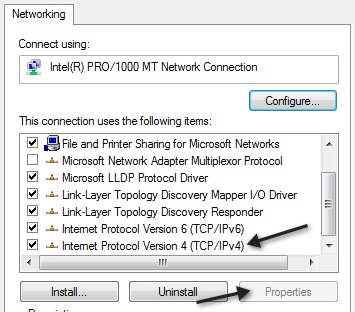
Now click on Internet Protocol Version 4 (TCP/IPv4) and then click on the Properties button.

Computer tips and tricks as well as software, hardware, internet that help make you more productive and your overall computer experience a lot more enjoyable. Computer tips and tricks, tricks,computer tips, computer, tips, information, listing, tip, computer tip, about, windows, internet, internet, ticks, explorer, Microsoft


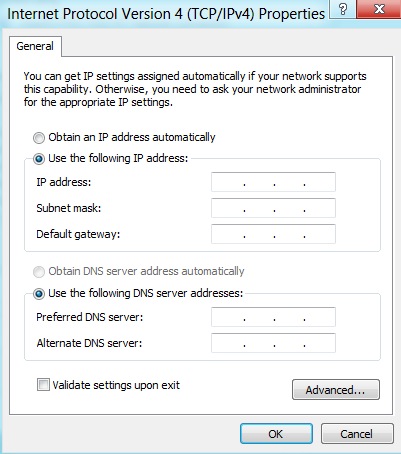
Finally, click on Use the following IP address and type in your static IP address. Whew!! That’s a long process for something so simple.

Computer tips and tricks as well as software, hardware, internet that help make you more productive and your overall computer experience a lot more enjoyable. Computer tips and tricks, tricks,computer tips, computer, tips, information, listing, tip, computer tip, about, windows, internet, internet, ticks, explorer, Microsoft


And that’s it! Yes a little long and drawn out, but it’s the same process once you get into the Control Panel. If you have any issues or problems, post a comment and we’ll try to help. Enjoy!
0 comments
 
Copyright © 2011. Alltechub - All Rights Reserved
Powered by Blogger